
******
I've been asked to make a tutorial on how to make a pyramid card, and finally I managed to take some photos, so enjoy and I'd love to hear some comments about the course and if anything is unclear.
Baza i podstawowa forma/Standard shape or the base
Potrzebujemy 3 kwadratów (u mnie 15x15cm) sztywnego papieru/kartonu. jeżeli użyjemy papieru skrapowego o naprawdę dużej gramaturze to nie potrzebujemy dodatkowej bazy.
We need three squares of paper or card (mine are 6x6inch). We may make the card with really thick DP and then it doesn't need additional base.

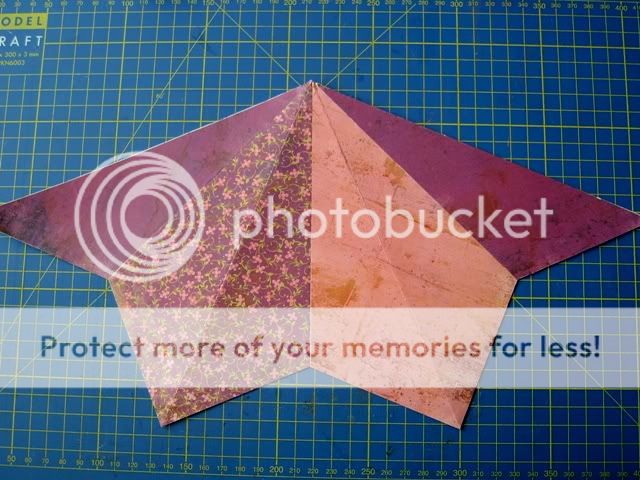
Składamy kwadraty po przekątnej i sklejamy je ze sobą tak, aby wszystkie stykały się jednym wierzchołkiem a kolory nachodziły na siebie.
We fold the squares in half diagonally and glue them so the points of all three touch and the colours alternate.

Zamykamy kształt wsuwając ostatni trójkąt (niebieski) pod pierwszy i zaznaczamy miejsce wiązania albo sklejamy na stałe. Jeżeli pozostawimy ten element niesklejony to kartka ładnie rozkłada się na płasko.
We close the shape by inserting the last triange (blue here) under the first one (yellow) and we either glue them for stability or mark the closure. If we don't glue, the card can be folded and mailed flat with careful placing of embellishments.


Jeżeli odpowiada wam takie rozłożenie kolorów to baza gotowa i można już przystąpić do dekorowania. Mnie się ono nie podoba i dlatego wprowadziłam parę zmian, a dodatkowa warstwa papierów pomaga usztywnić konstrukcję jeżeli chcemy dołożyć więcej dekoracji.
If you like how the colours alternate, and you used a thick paper, that's it. go ahead and decorate. I didn't like it so I made some alterations, plus I wanted to add more embellishments and decided it can use an additional layer of paper.
Zmiany i ulepszenia/Addons and upgrades :P
Po pierwsze, odcięłam ostatnią "klapkę" i przykleiłąm ją na pierwszej w tym miejscu, w którym znajduje się na stojąco. Na zdjęciu fragment zamalowany na szaro. Uzyskujemy kształt jak na drugim zdjęciu.
First, I cut last triangle along the diagonal line and glued it on the first where it would be placed when the card is standing. In the pic the glued area is coloured. We should end up with the shape visible in the second picture.


Następnie z 3 arkuszy ozdobnego papieru o takich samych wymiarach jak baza wycinam kształt latawców - kwadrat składamy po przekątnej, rozkładamy, dwa przeciwległe wierzchołki zaginamy do środka do linii zgięcia, odcinamy.
Then we prepare 3 sqares of DP the same size as the base squares and we cut them into kite shapes by folding diagonally, unfolding, then pulling two opposite corners till the middle fold line, crease and cut.


Jeden z latawców rozcinamy wzdłuż przekątnej linii zgięcia i obklejamy bazę pamiętając, aby wkleić tasiemki do zawiązywania :P. Jedno skrzydło należy minimalnie podciąć (1-2mm) aby lepiej się składało na trzy do wysyłki.
You need to cut one of the kites along the diagonal fold and you glue the paper to the base - it's convenient to attach the ribbon for closure now, something I forgot :P If the card is to be sent folded, you need to trim a slight strip of one of the flaps for easy folding.
Z pozostałych 6 trójkątów robimy dla utrwalenia drugą, mniejszą piramidkę z kwadratów o boku 12,5 cm :P
With the leftover scrap triangles we make another smaller pyramid to rehearse the skill :P (base sqares measuring 5x5 inches)


Tym razem papiery ułożyłam tak, aby każda ściana była w jednym wzorze i nie wycinałam "nóżek" u podstawy trójkąta. A tutaj jeszcze kilka ujęć dla porównania wielkości.
This time I organised the papers so each side is of one pattern and I didn't cut the little pieces at the base of the triangles out. And finally there are some more pictures of them both together to see the sizes.

Mam nadzieję, że zdjęcia wyjaśniają dość ogólnikowe opisy, prosze o konstruktywne uwagi na przyszłość :)
I hope it is clear enough with pictures ( well, I can't really write several thousand words about it *wink*), I appreciate comments and please point out if anything is not understood.
It looks pretty clear to me! Thanks for the tutorial. You are a great teacher. (I'd be saying "slap this on that"...blah blah blah.)
OdpowiedzUsuń